How to Paint an Outdated Slate Floor

I painted a slate floor in this house we bought. It was totally outdated and frankly, well, ugly. The slate tiles were mint and purple with cement grout lines.
Let me show you how I did it.
This house is the third we have owned in this neighborhood. We used to live down the street. Every day when I drove by this house I would say out loud “there’s my next house!” Or “that house it calling out to me, it needs me”. When it unexpectedly came on the market (at a time that we were not planning to move) we jumped on it anyway!
Many of the houses here were built in the late 50s or early 60s by the same developer. Although they were all custom homes, many of them have similar slate floors in the entry. I have been in several of the houses around here during estate sales. The colors I have seen of the slate tiles vary from greens and plums (which is what we had) to reds and blacks, and other weird shades.
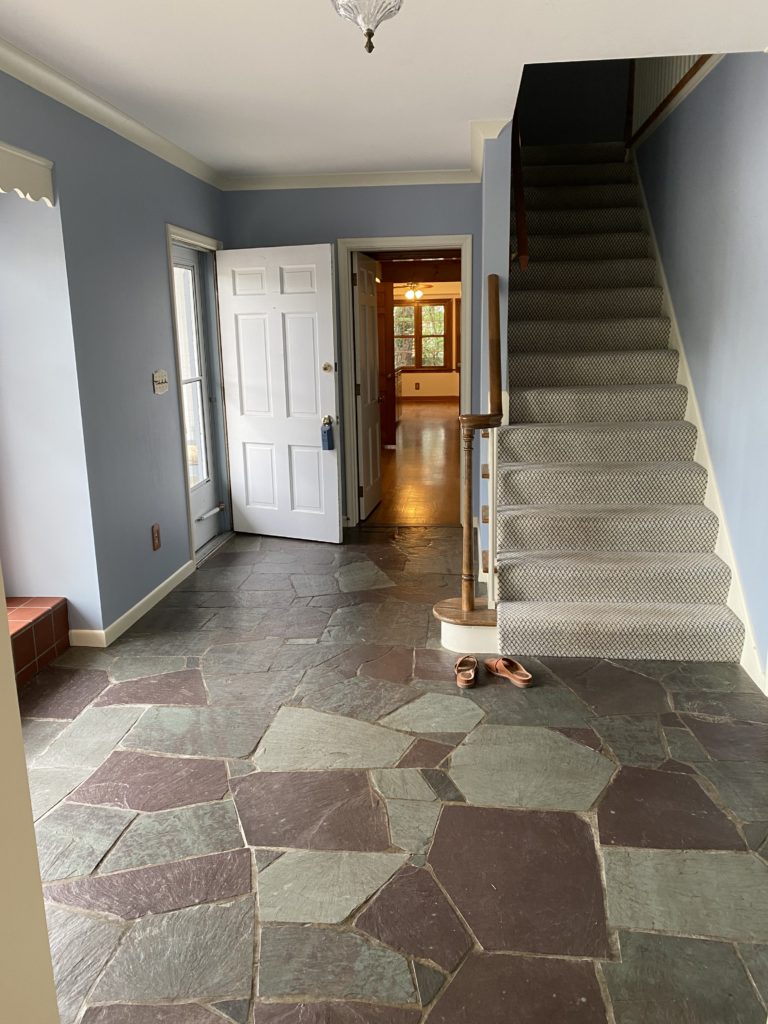
My History With Slate
In the first home that we owned in this neighborhood and renovated, we had a small portion of slate floor in the entry and near the back door. The slate was set in cement that was like 3 inches thick. When they demoed the slate floor, it took so much manpower that they damaged the whole subfloor. There was a huge hole all the way to the basement! It was a super fun job (hahaha) so when I saw these slate tiles, I cringed a bit about the possibility of having to remove them.
After much deliberation, knowing this would be our forever home (or as forever as we get), I really wanted something classic for this space. The home is a Cape Cod style and screaming for a blue and white scheme, which I was much obliged to provide. I wanted a classic look that would stand the test of time.
When I finally decided, you know what I came up with? Slate! Yup, I wanted slate tile, just not mint green and plum. And then, DUH, I remembered who I was and what I do. I would chalk paint the slate floor the color it needed to be! Slate is a very porous stone and the paint adheres beautifully to it. Trust me, I have spilled paint in many spots all over the cement floor in my warehouse. I have been walking on that for more than 6 years now, and the paint ain’t coming off!

Here’s how I painted an outdated slate floor:
First, I planned to do this when my hubby was out of town, just so I would have less people in the house needing to get around it. The room is a decent size entry, so I planned to do it in stages, so we could still get around.
Next came the cleaning. As I said, I was going to work in sections over several days, so I only cleaned the area I would work on that day. I just used a simple product, something like Simple Green, and vacuumed the area and then hand mopped it.

Then I got to work! I chose the color Tarnished Silver from my Bungalow 47 Furniture Paint line. It is a dark charcoal gray and was the perfect shade I wanted for this space. The paint is a clay and chalk paint that adheres to most surfaces like wood, glass, metal, stone, fabric, and much more. Slate is a great candidate for painting and was super easy for a do-it-yourself project.
How I started
I taped off the transition areas and base moulding and began painting each slate tile by hand. Painting the grout lines was not in the plan. I wanted it to look natural and not like the whole floor got rolled with paint. I have painted a floor before with epoxy paint. But I feel that look works only when you want the tile and the grout lines the same color.
A synthetic bristle paint brush is the best choice, and I had a few different sizes on hand. The one I did most of the floor with was a 2″ straight edge brush.
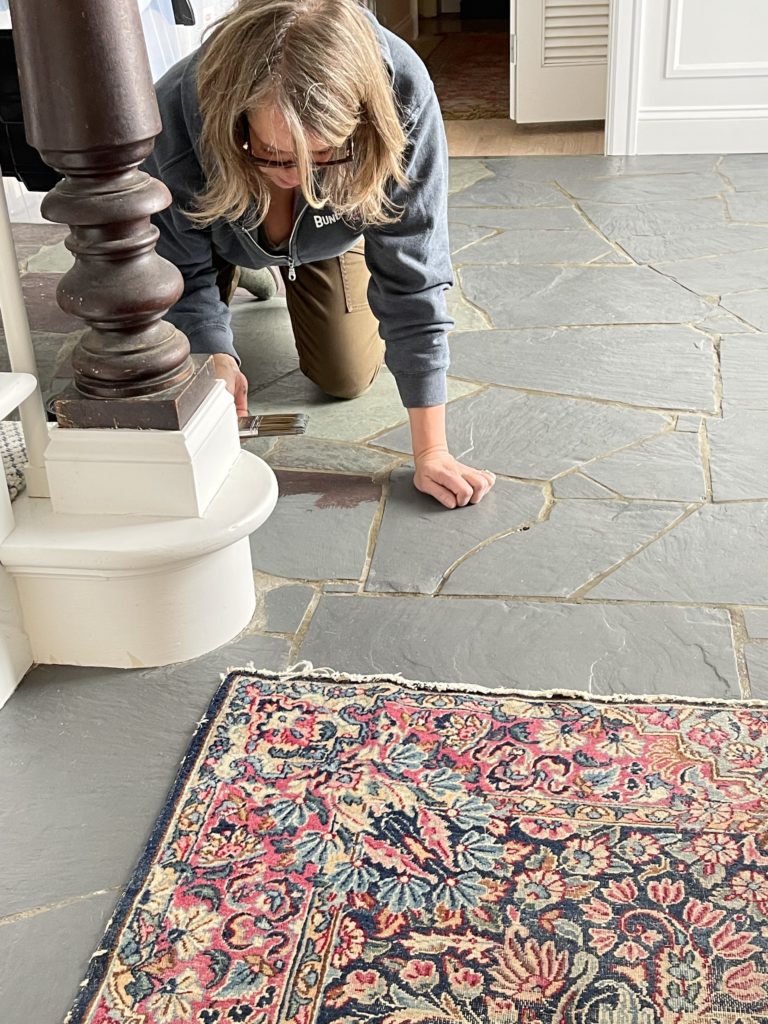
I painted each individual slate stone
Dipping the brush in paint just at the tip was very important. I kept a controlled amount of paint on the tip, then beginning at the edge of each stone, cut a clean line on all the edges. Then I simply painted the surface of each stone separately and carefully.
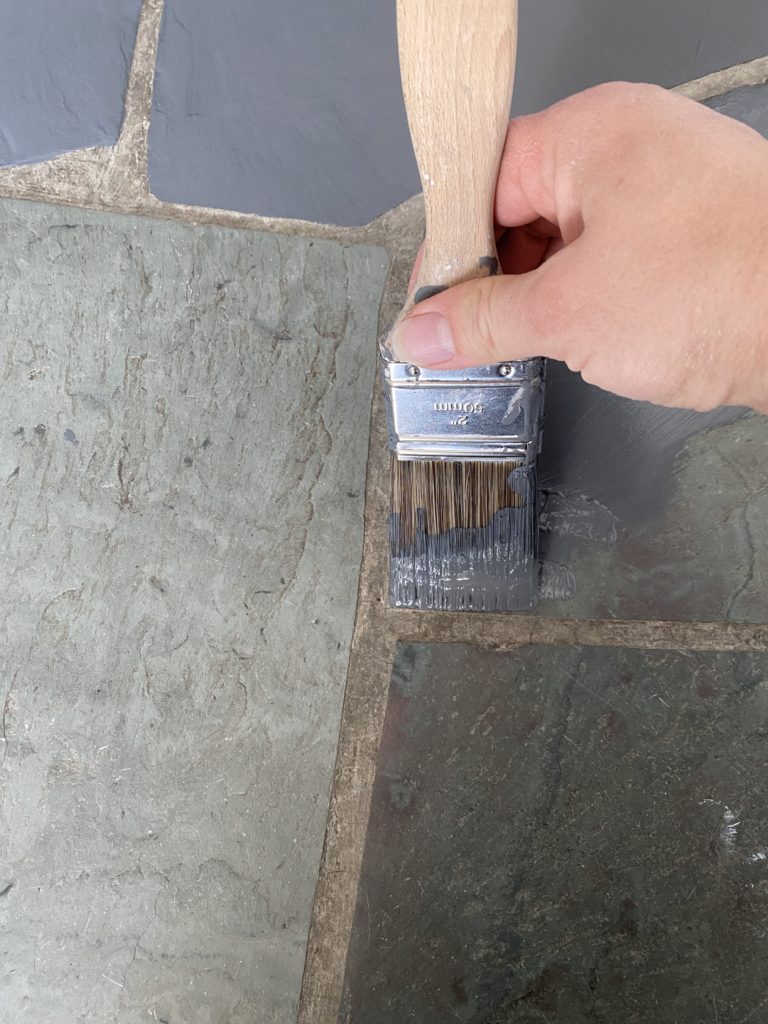
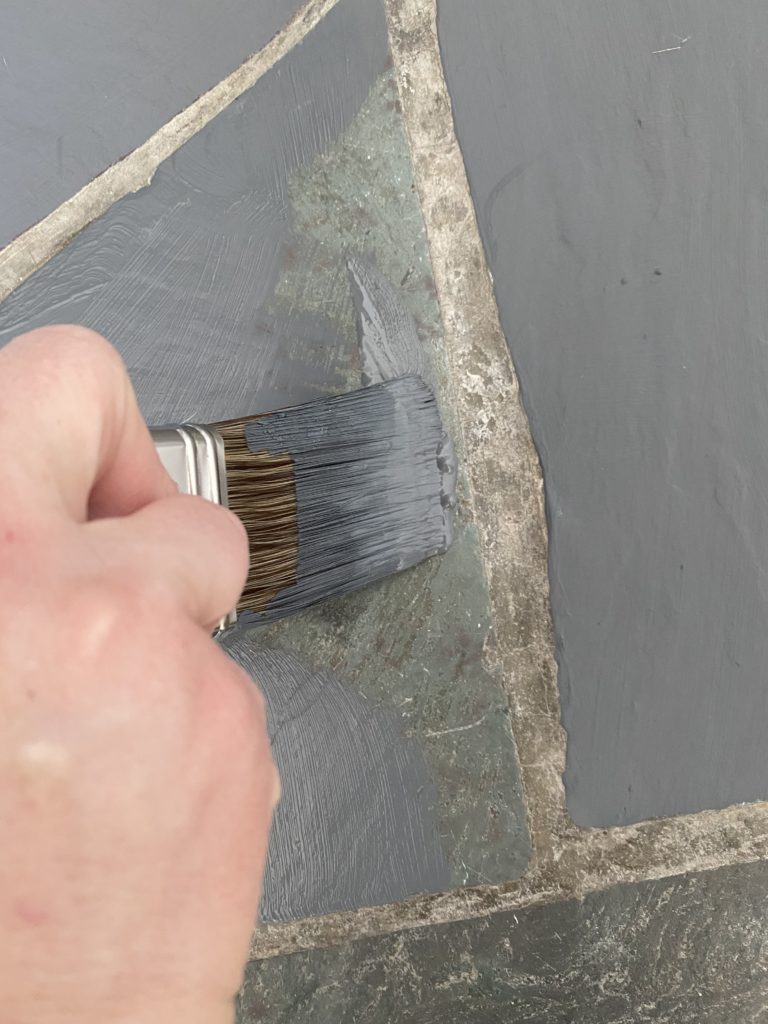
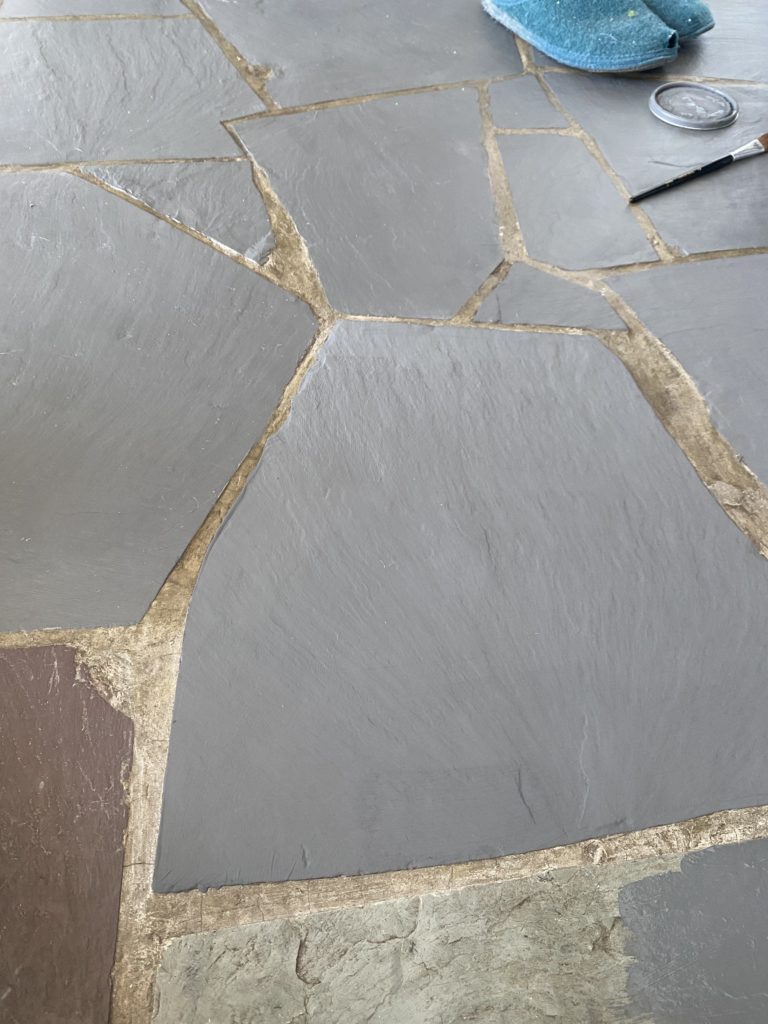
Important Steps
This chalk and clay paint dries very fast. I wanted to be sure that it was getting closer to cured before I did anything else to it, so I let it dry overnight. As most, my dog is all over the place, so I set up barriers so he wouldn’t walk on it. I knew he would try cause he’s so snoopy and the only time he is interested in me is when I’d like him to actually ignore me. That is his usual because he loves my hubby, me not so much.
The next day I buffed the surface using a clean dry, white towel which took away that flat finish look and gave it a natural sheen.
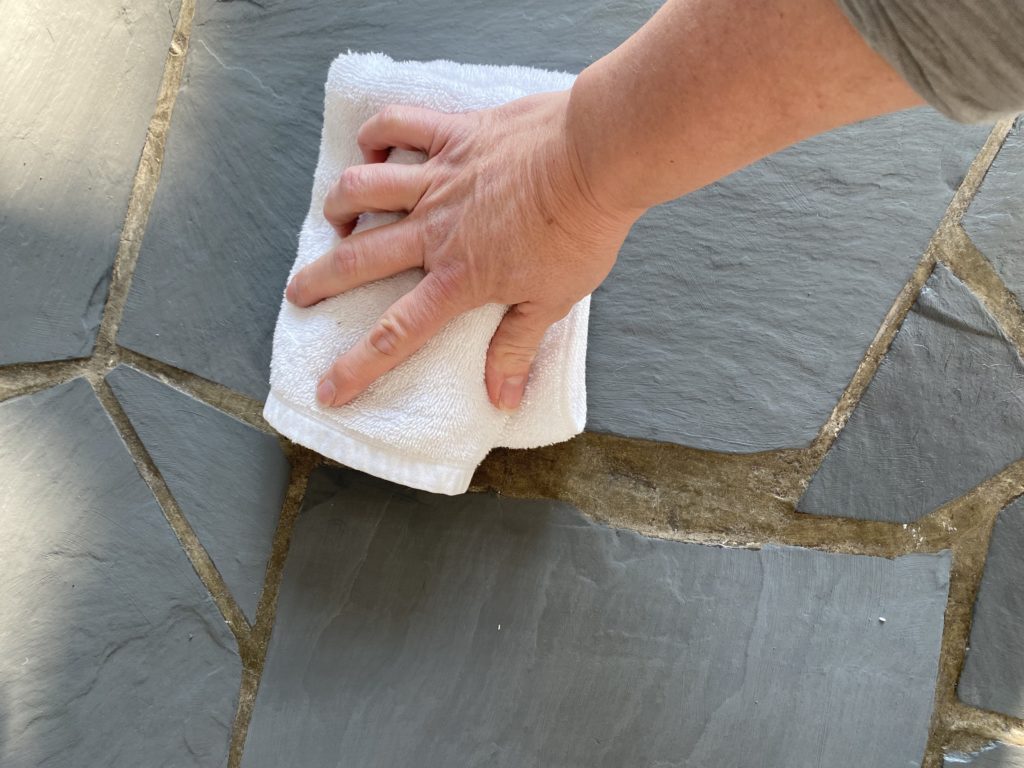
Buffing is Key
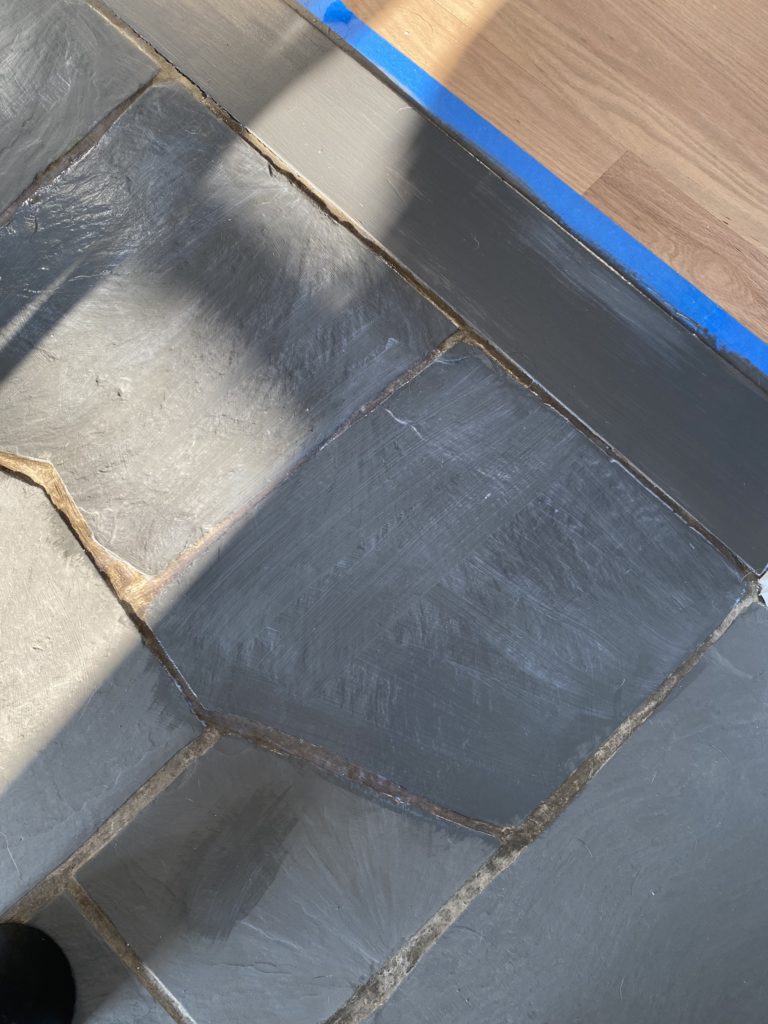
Buffing really brought out the highs and lows of color in the paint and the texture in the stone. Look at the photo below. Can you see the two stones at the top of the photo that look like they have more dimension? Compared to the one sliver of the neighboring stone where it looks like it was painted with flat paint?
That is the beauty of using a chalk and clay paint like Bungalow 47! When it was buffed, the stone really took on a more natural feel and made it look like natural charcoal colored stone rather than a painted version.
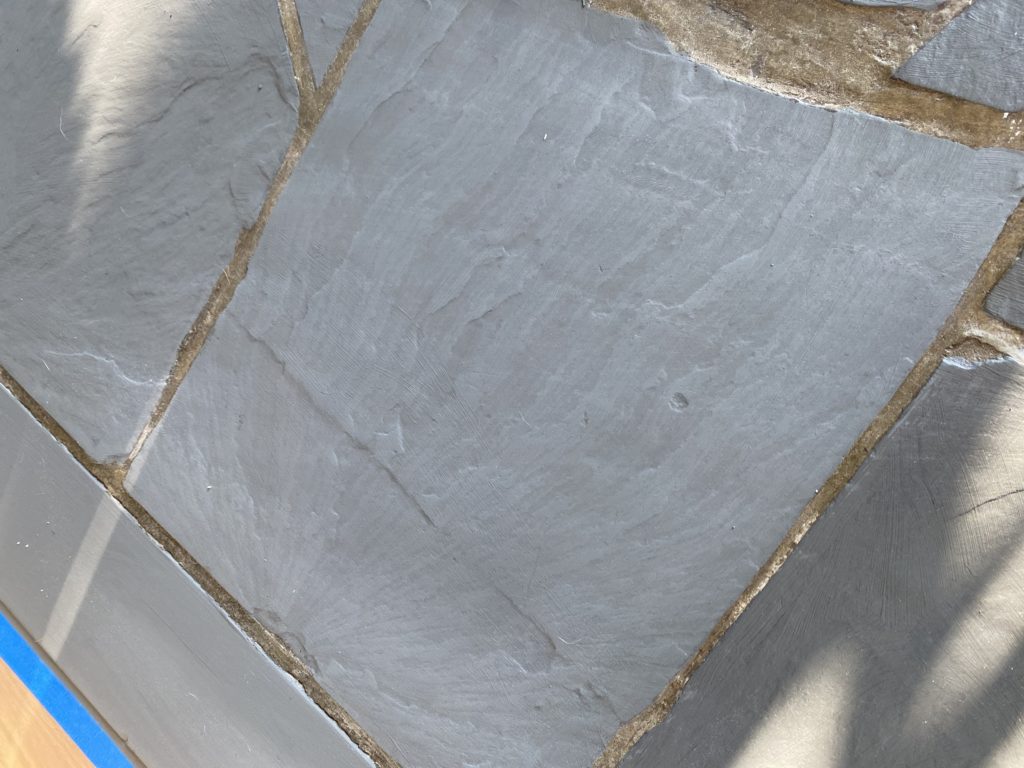
Taking my time painting the stone
I worked in sections and took breaks along the way which stretched the project out to about a week. Taking my time allowed the paint to fully cure, but soon I had the floor done! You can see my empty Rubbermaid containers sitting around as blockades for the dog. Luckily he’s short.
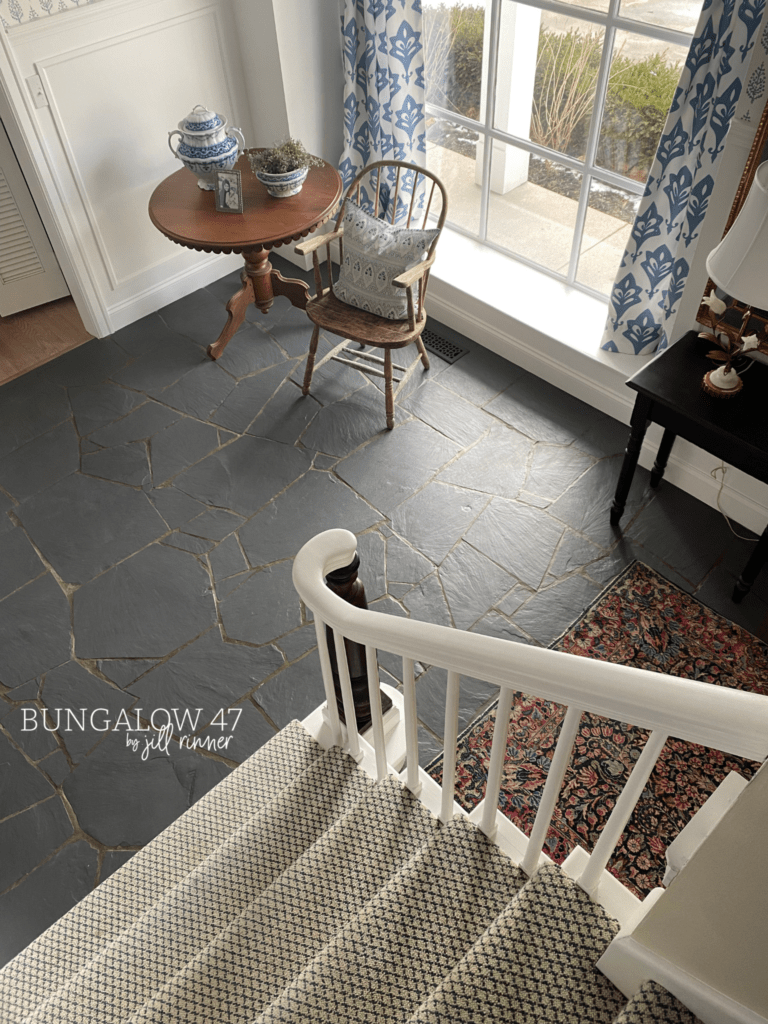
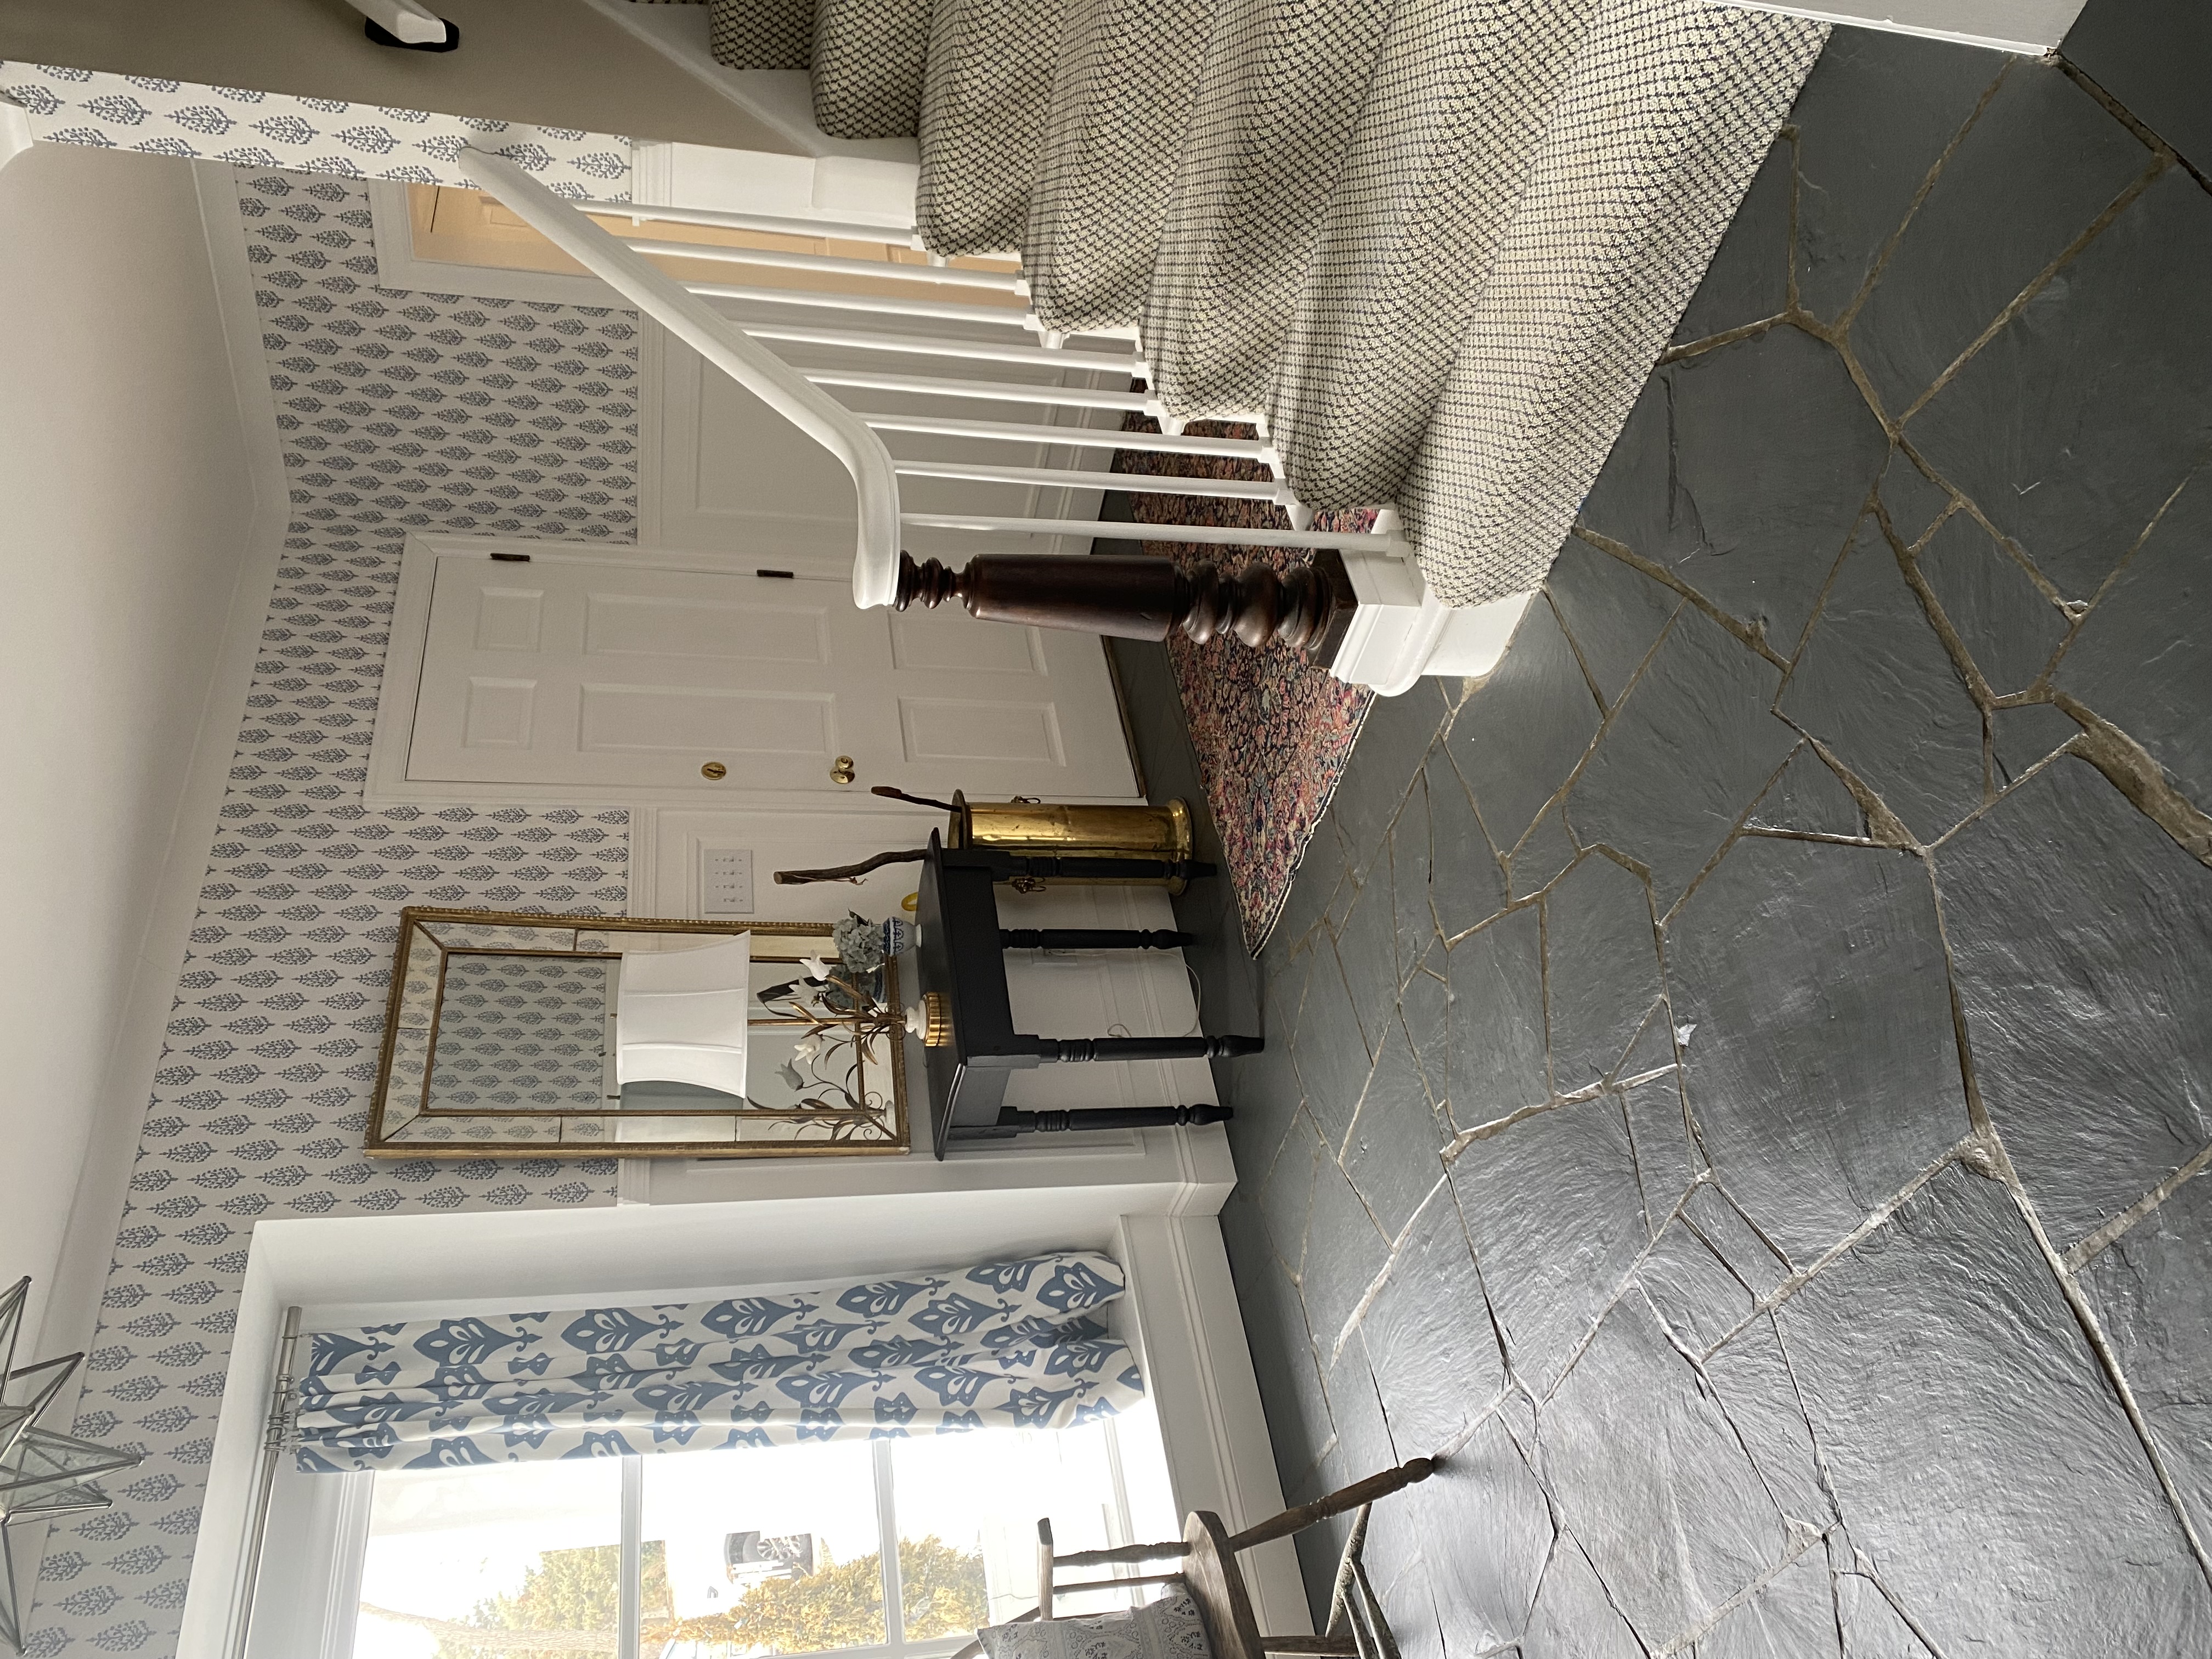
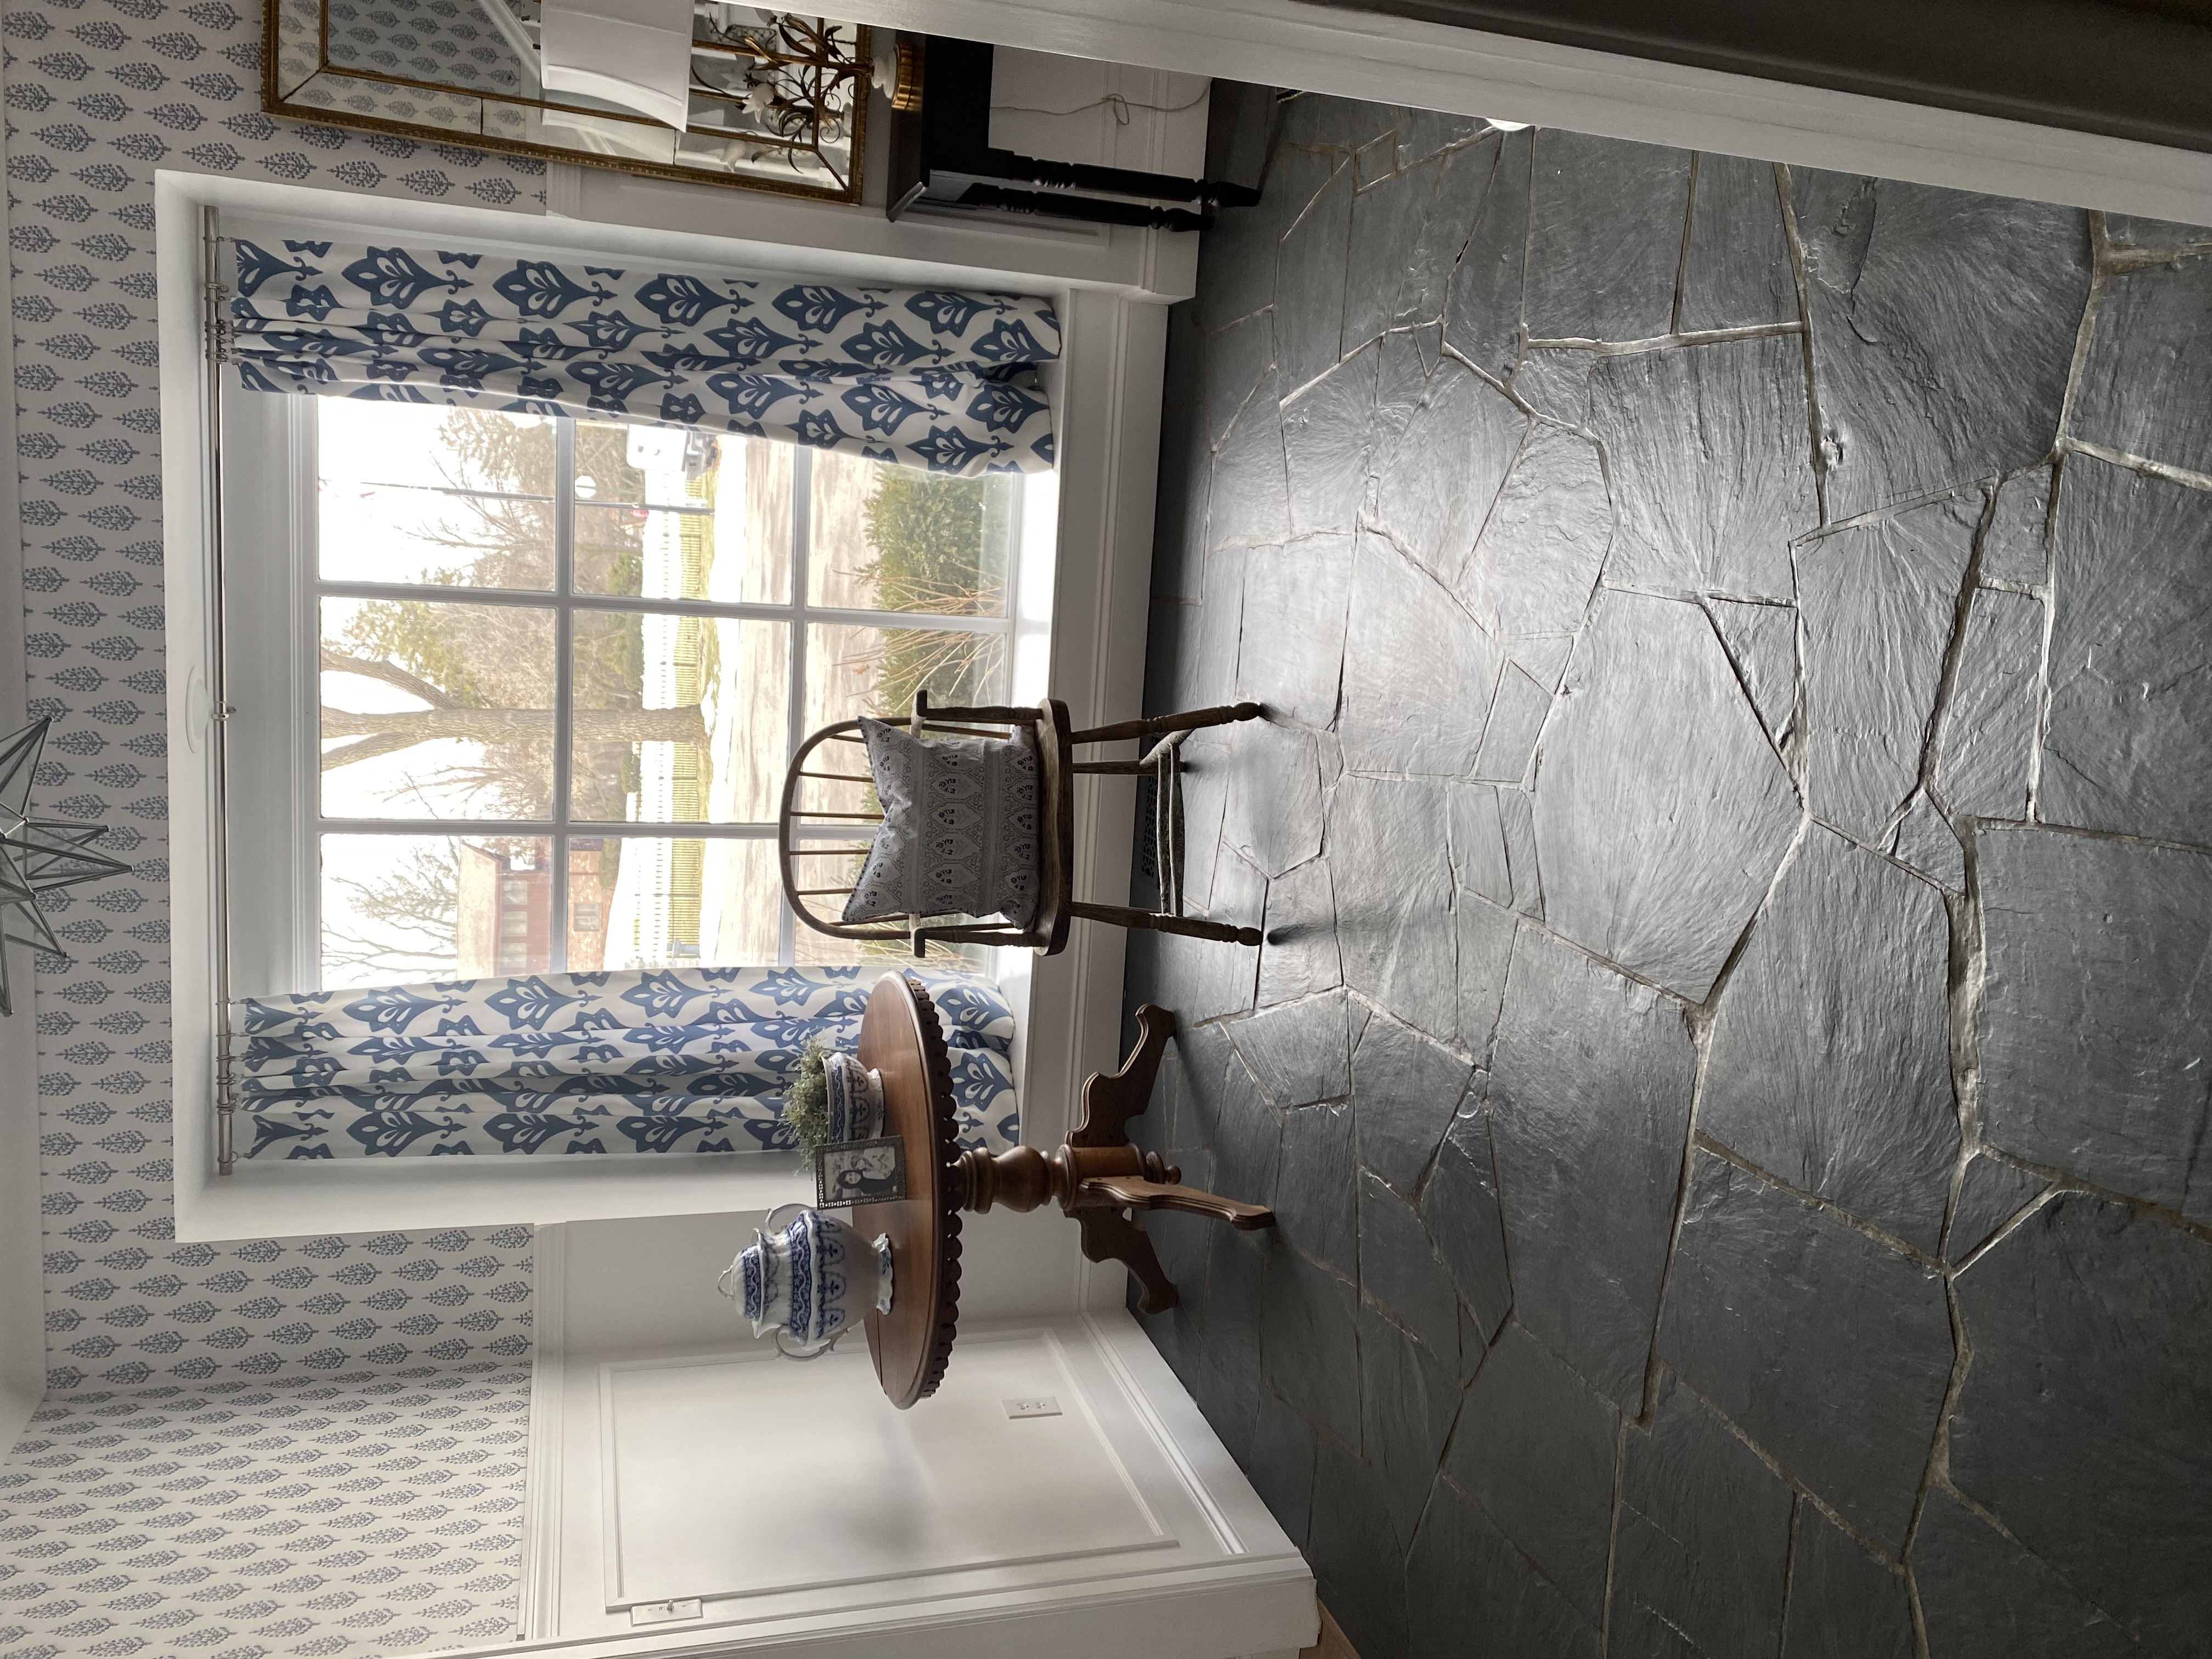
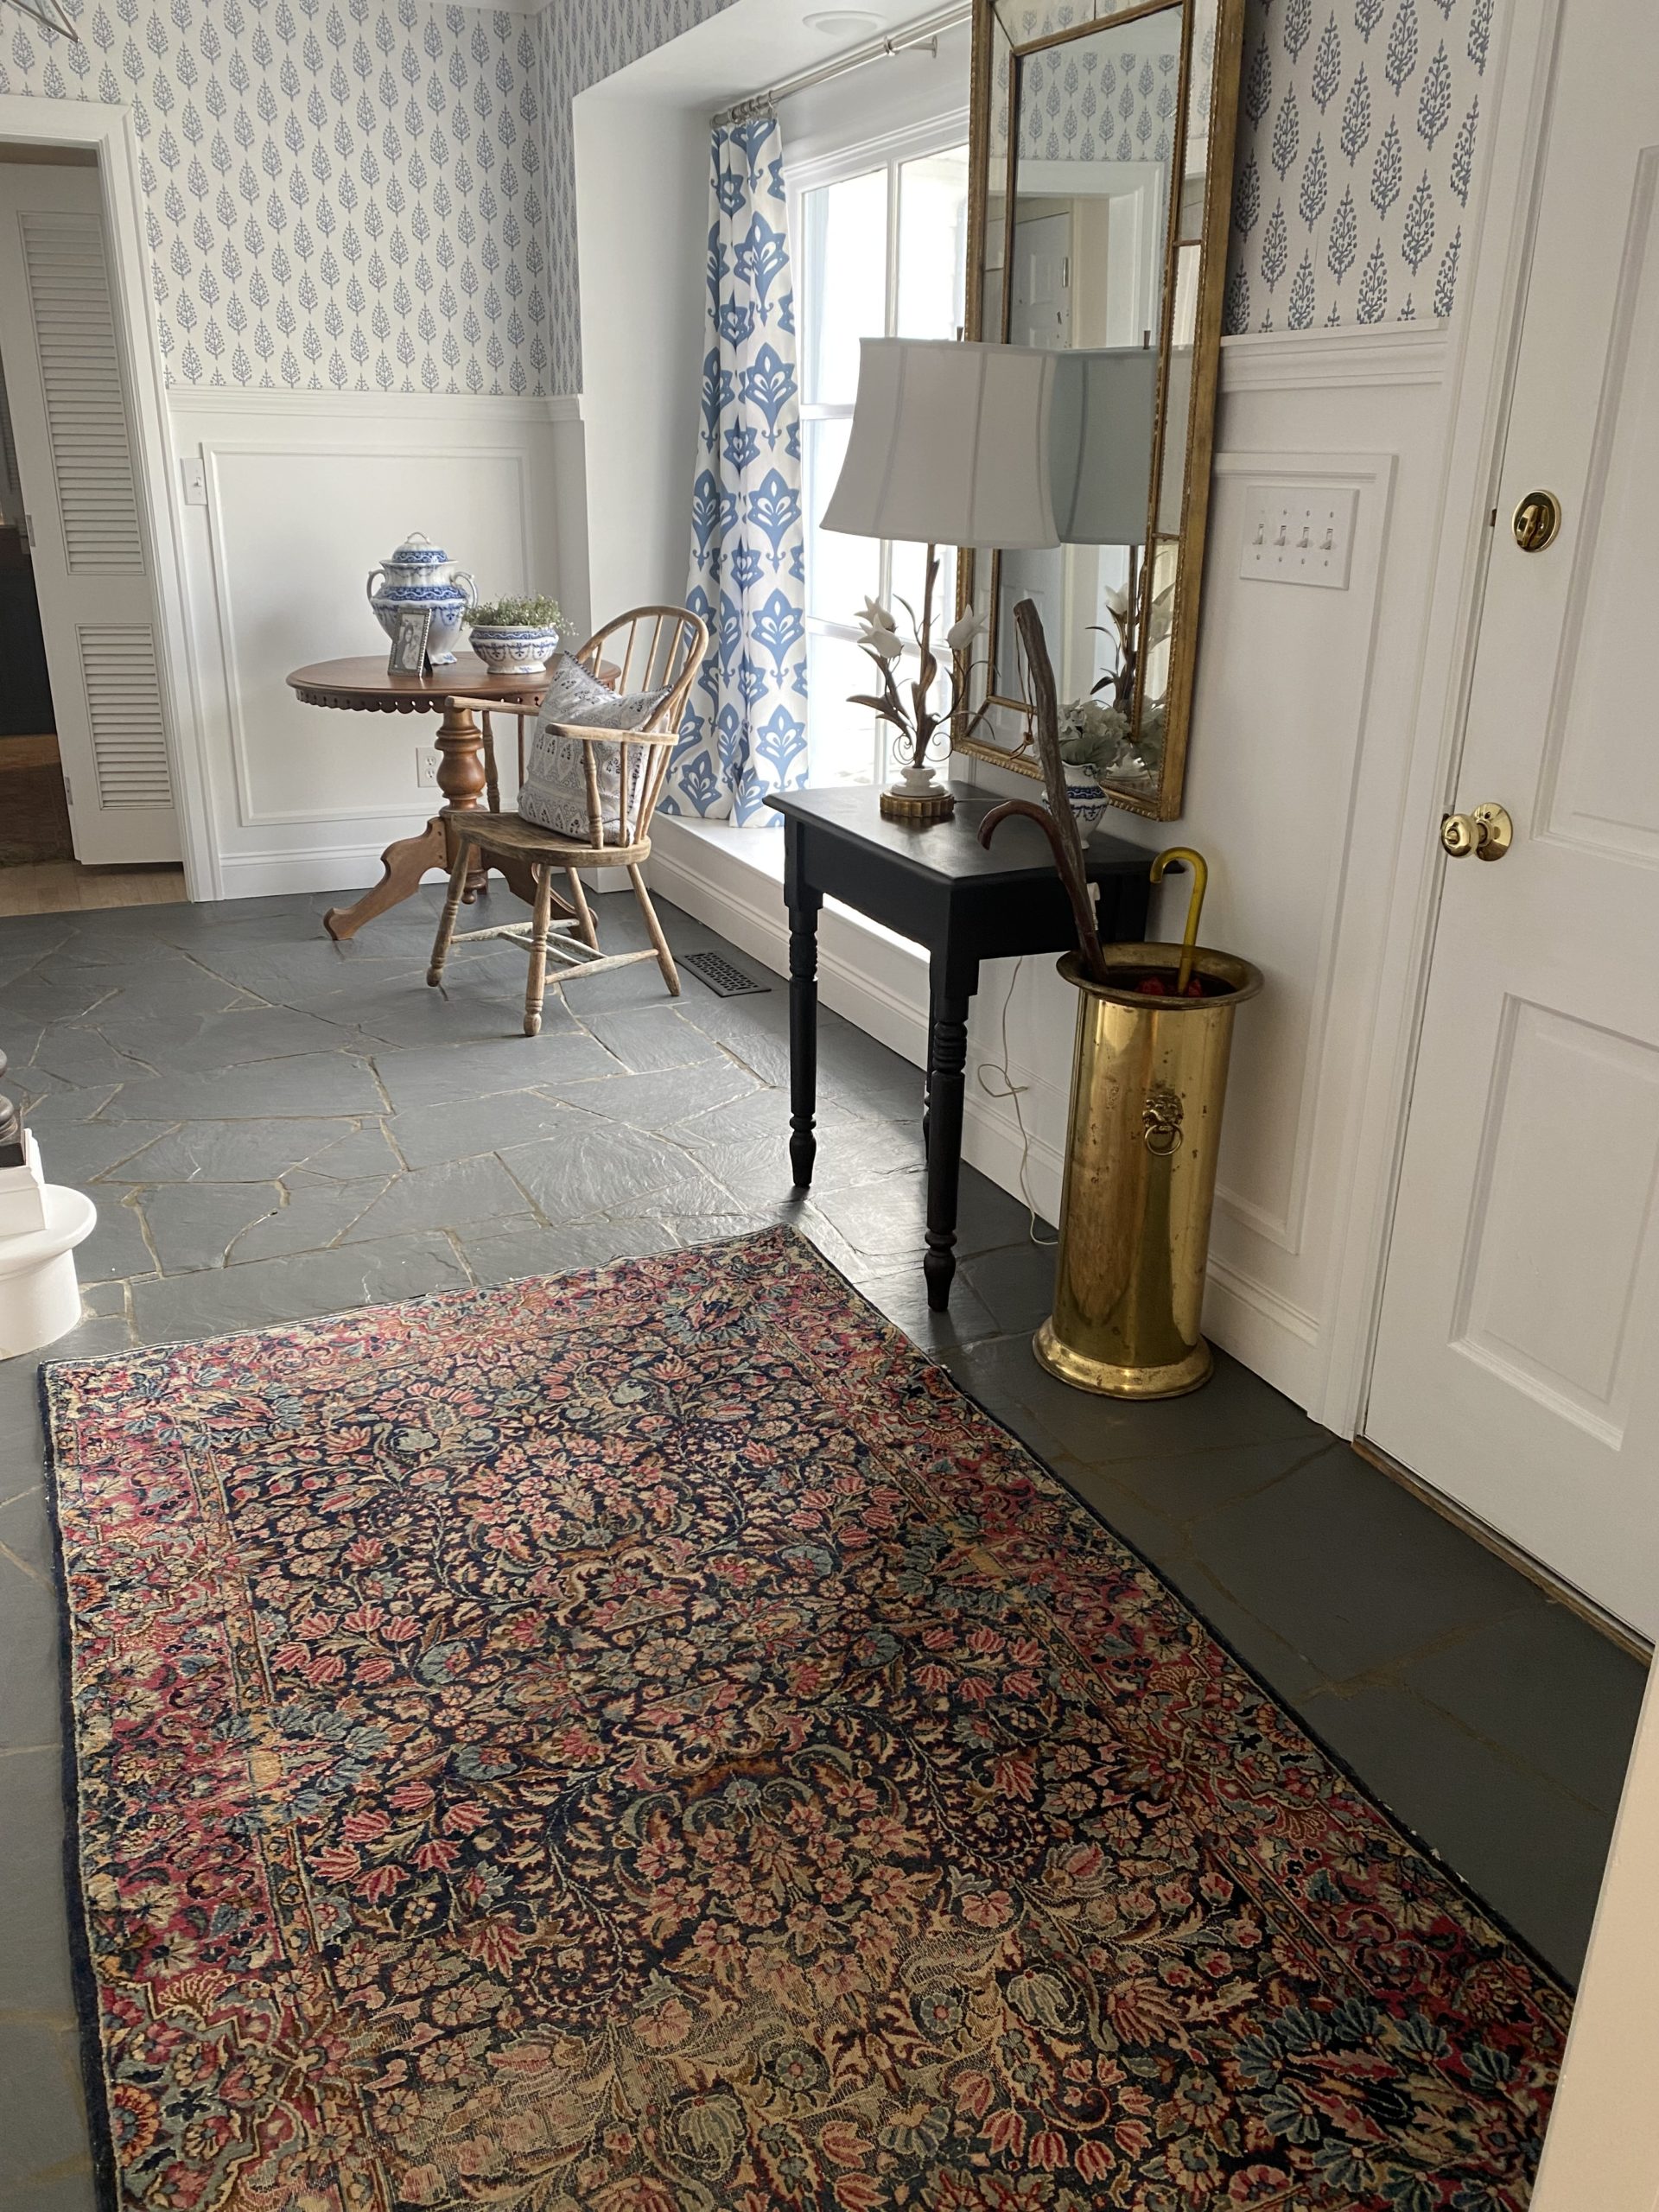
After finishing, I seriously just sat on the stairs and obsessed over it for hours. Well, maybe a bit less but it looked so freaking awesome that I was congratulating myself on a job well done. When you are in the room, you would never know that it was painted and not the original color. I’m not kidding, you cannot tell this slate was painted.
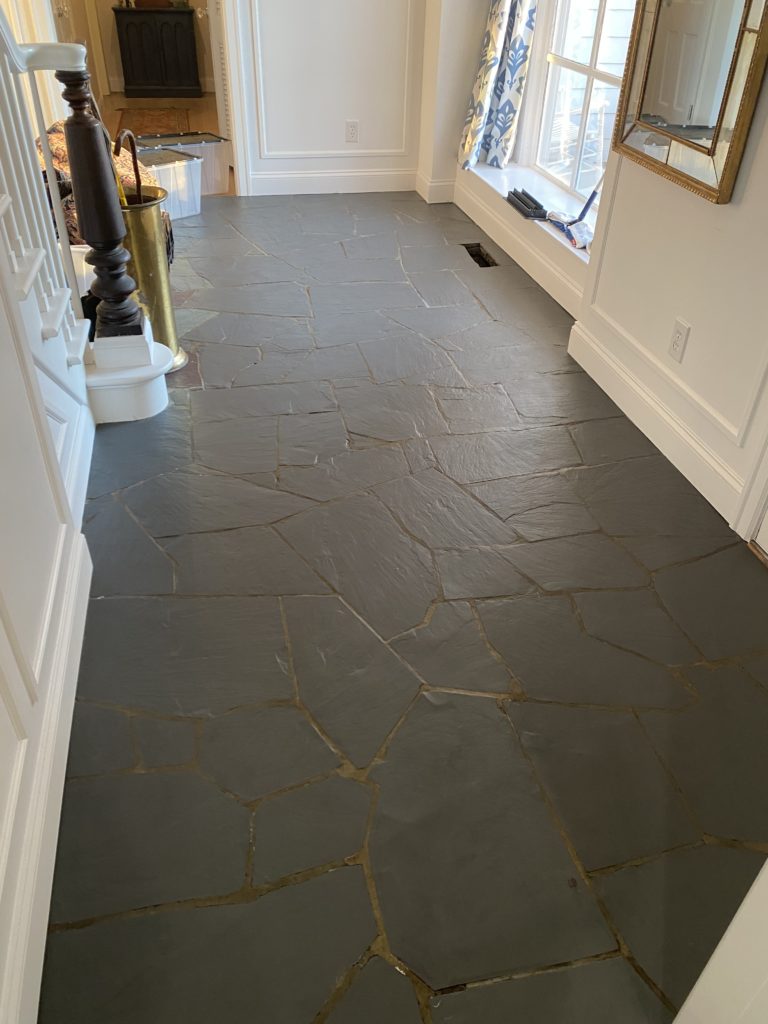
Applying the Finish
When it was completely painted and buffed, I then brushed on the Matte Finish as a final protectant. Our Matte Finish is a water and chemical resistant product that is awesome for protecting the painted finish. It gives it durability so you can live with your finished project. I wasn’t too worried about getting it on the grout since it dries matte, so I just brushed it on the floor using a large brush. You could also use a roller.
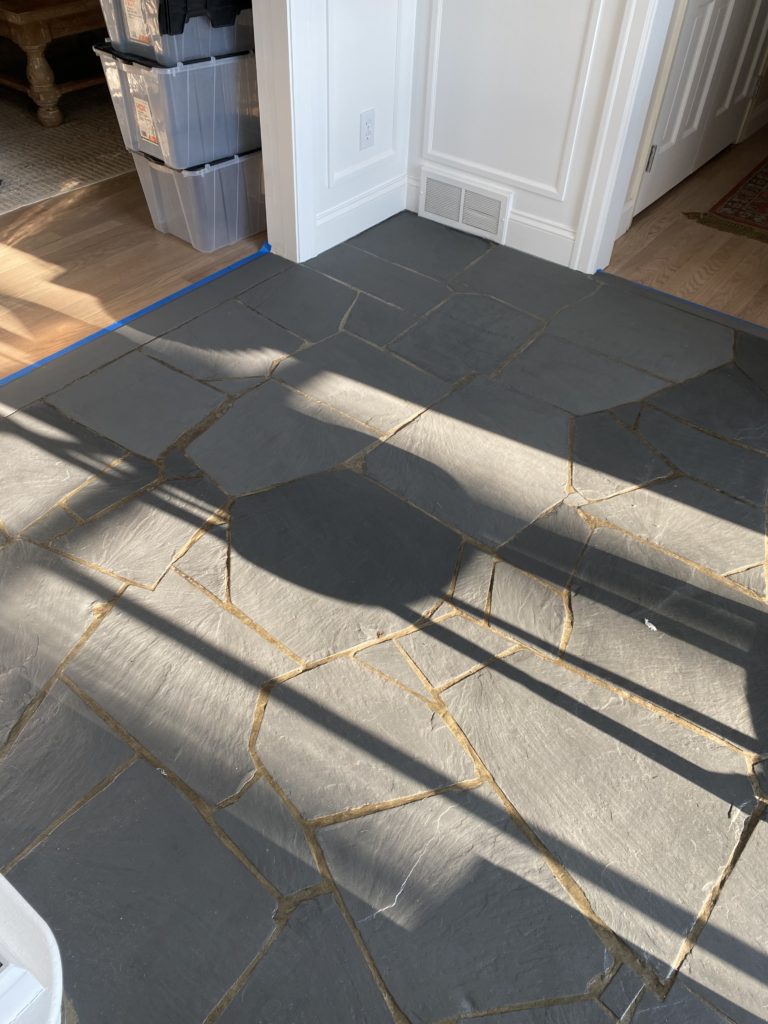
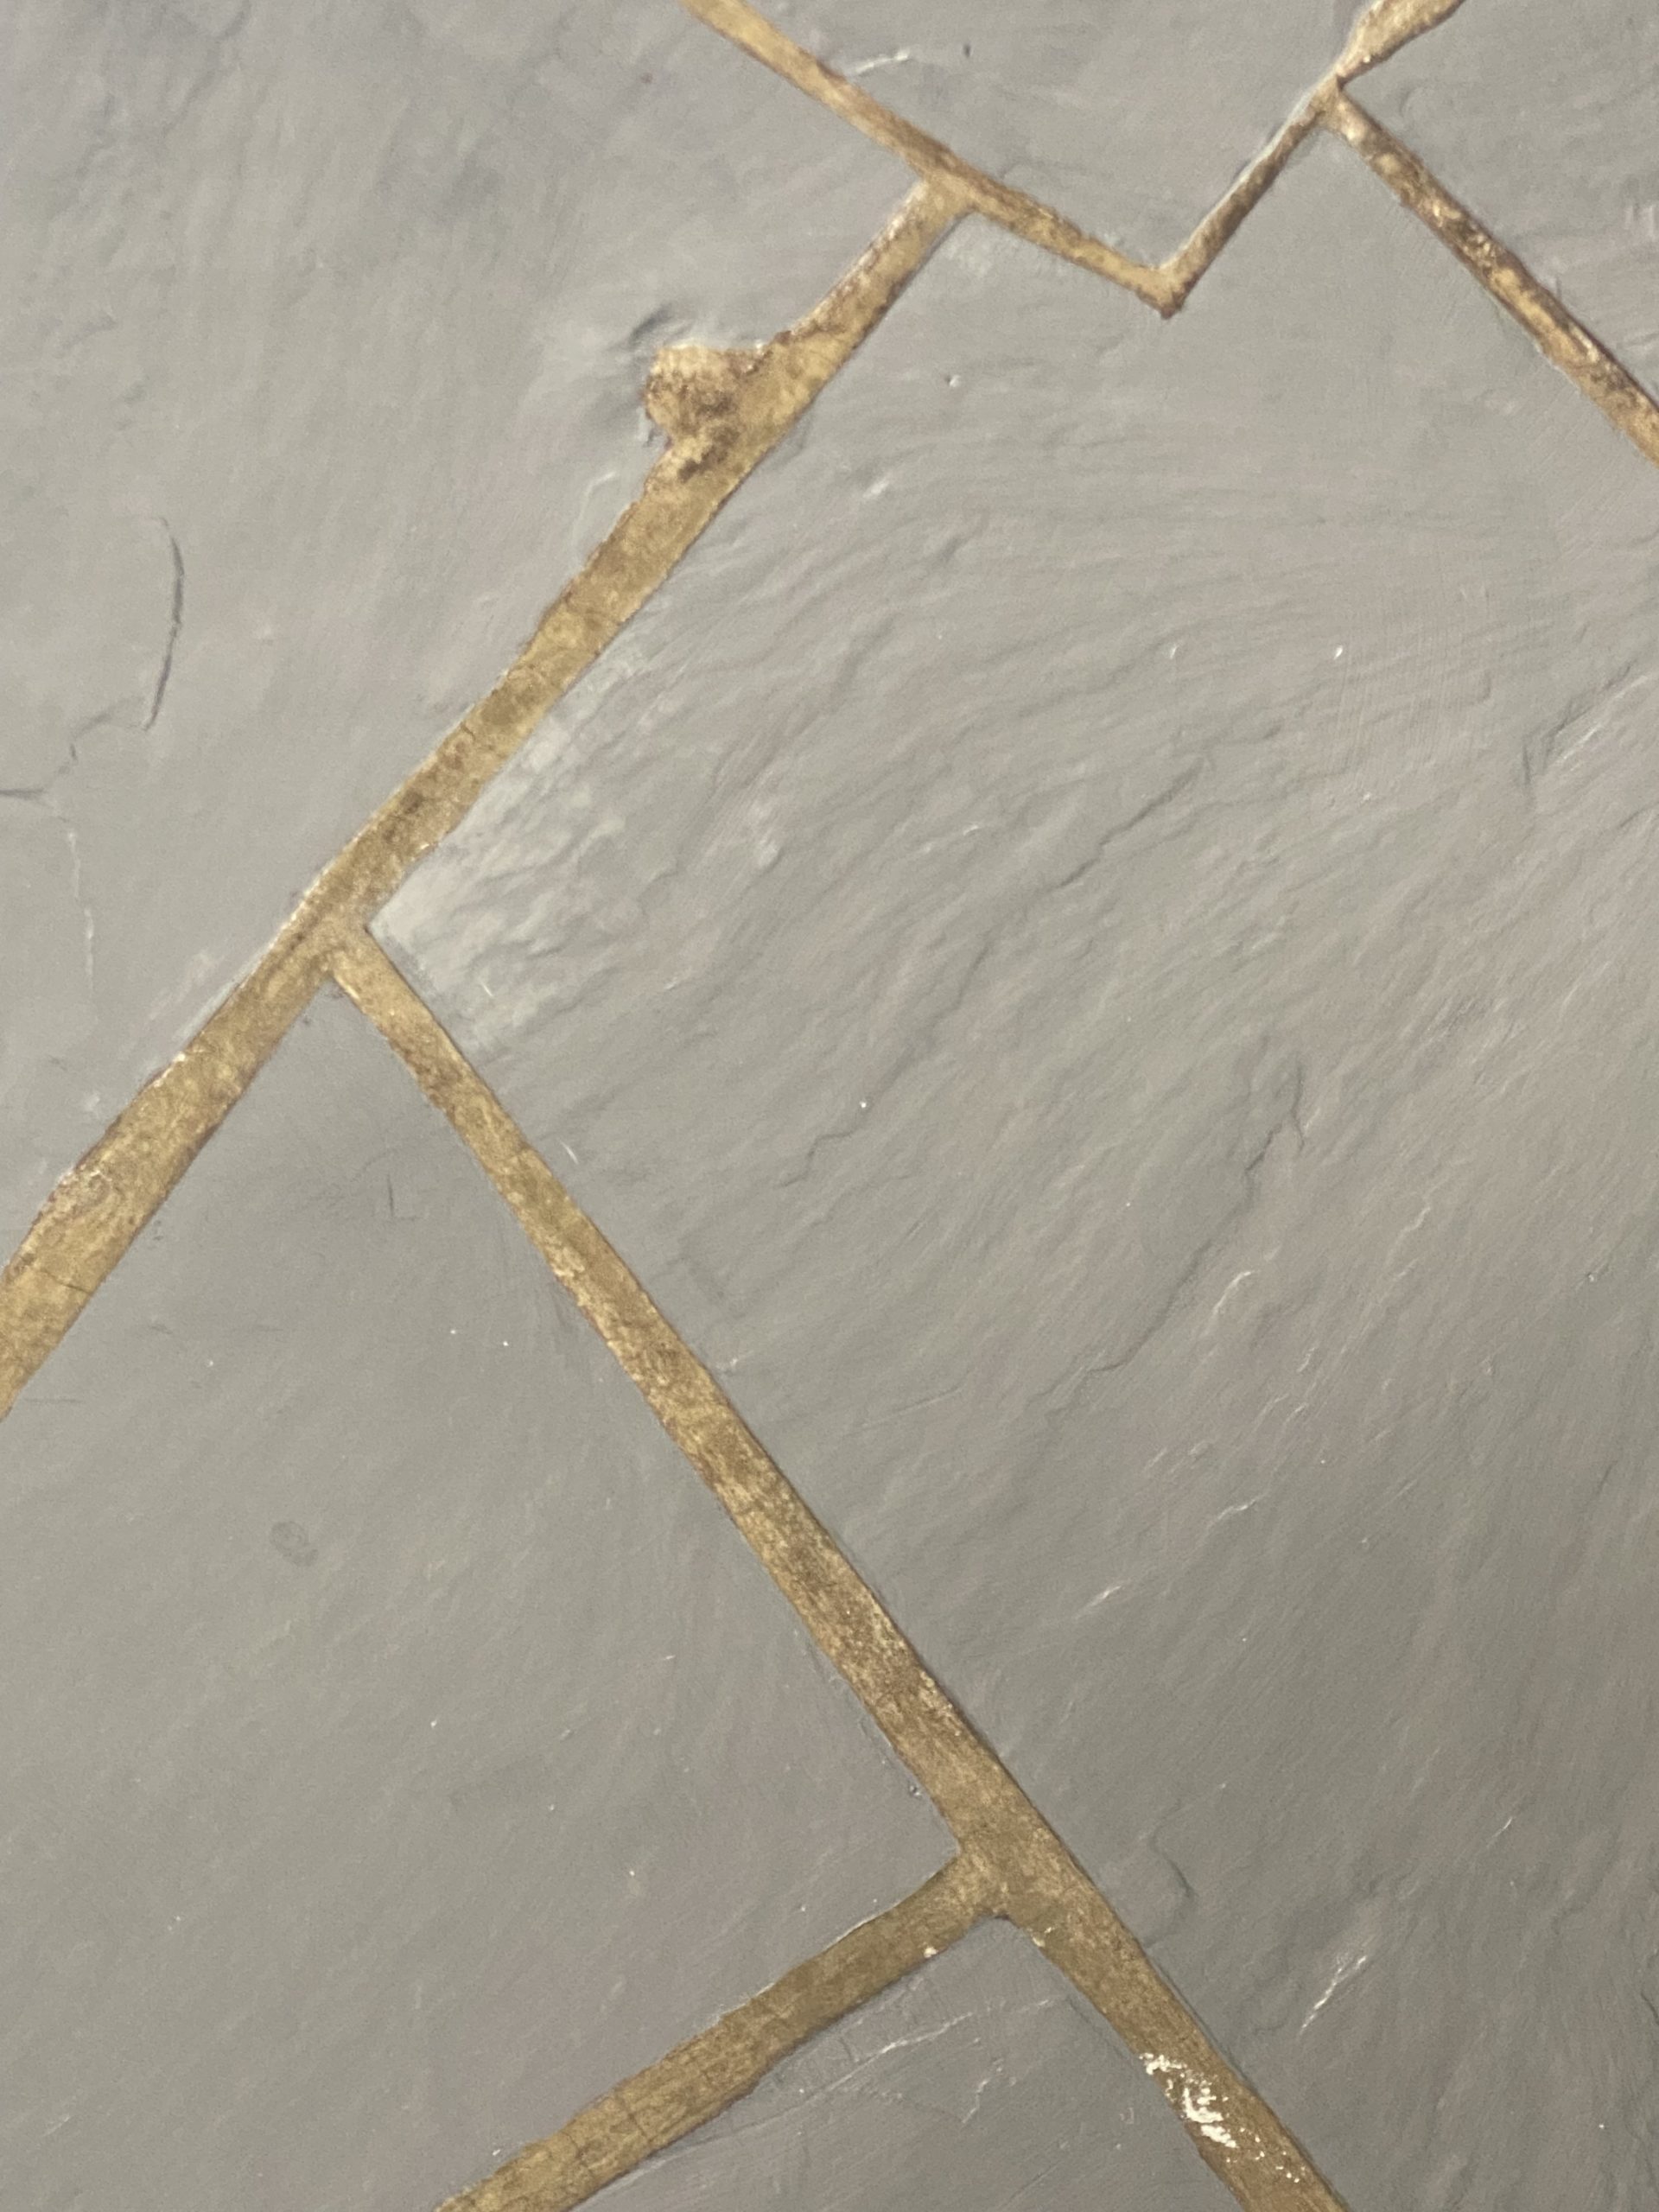
It’s All About the Light
Matte Finish will make the paint appear darker due to the matte sheen that reflects light differently. The finish is NOT a dead flat. This picture above on the left shows the upper left corner without finish, where the other stones in the photo had received the finish. The good part about this is you can see if you missed any spots. In the photo on the right, you can see where I missed a spot. With my second coat, I made sure I covered the full surface.
The Matte Finish appears milky when in the can. You can see here where it has been brushed on. Do not over work it trying to get the color out, it will dry clear. Simply brush the product on with a few strokes and leave it, letting it do its thing. When it’s dry, you won’t see any of the brush marks.
Matte Finish on Furniture vs. Floor
Note that when I put the Matte Finish on a piece of furniture, I would work in one direction spreading out the brush lines. Due to the uneven nature of the slate, I wasn’t worried about putting the finish on perfectly as the slate has several highs and lows to its uneven surface.
Please Note
Disclaimer: Although our Matte Finish worked wonderfully for my project, and is holding up great, the product is made for lighter water use such as furniture. If your floor is in an area that needs to be heavily mopped frequently, you may want to consider sealing your painted finish with a clear acrylic sealer top coat specifically for floor usage. Always test it out in an area that is inconspicuous to make sure it gives you the look you want. I would also choose a matte finish versus something that is shiny. I do not recommend this for inside a shower.

The room is now complete and we love it! What a transformation! We’ve been walking on it for over a year and it’s still perfect looking. This room is in the center of the house and is the thoroughfare to all the rooms on the main level and gets the most traffic. It looks as pristine as it did the day I finished it. If any scratches occur in the future, I have paint for touch up, where I can simply repaint the single stone that needs help at that time.
How much was this project?
On this project, I used two quarts of the Tarnished Silver color, and one quart of Matte Finish so overall it was about $130 to paint this floor.
If you have a slate floor that you hate the color, I would definitely paint it! Why live with something you don’t want? You can do it and Bungalow 47 Furniture Paint can help!
Next up, I’ll share how we transformed the entry room and added our personal style. You can read about DIY paneling here. If you’d like some good decorating inspiration, check out my Pinterest boards here.
After living with the paint for a year, I wrote a post about how it is holding up! Please read this so you know what to expect. There are also color recommendations in that post.

If you like what you see here, save this to your Pinterest board for inspiration.


YAY! I love to hear success stories of using our paint product. Creating a home you love is sooooo important and I am so happy to have been a tee tiny part of helping you fix a problem. Thank you so much for using Bungalow 47 Paint!
We used this technique to “fix” an issue with a slate hearth in our new home. Sometime during the post close punch list work, the black hearth was stained – appeared to be some type of oil. Nothing could remove it. We drove 90 miles one way to purchase the product – the trip was worth it.
The techniques and the product combined to produce a perfect results. The hearth actually looks better than it did at close – it is more of a matte finish and as such looks more like the natural stone that it is. Thank you Jill and team!
Hi Terri, Thanks for writing. Our paint is made for interior, and although we have painted outdoor furniture in the past, it has lasted a few seasons outdoors as most interior paint would outside. My best guess is to definitely use the techniques I used (such as NOT painting the grout) but I would recommend that you research and find a paint made specifically for exteriors, especially if you live in a climate that gets four seasons. Thank you so much for visiting the blog and I hope it at least inspired you to do the project. Best of luck, Jill
Hi Terri, Thanks for writing. Our paint is made for interior, and although we have painted outdoor furniture in the past, it has lasted a few seasons outdoors as most interior paint would outside. My best guess is to definitely use the techniques I used (such as NOT painting the grout) but I would recommend that you research and find a paint made specifically for exteriors, especially if you live in a climate that gets four seasons. Thank you so much for visiting the blog and I hope it at least inspired you to do the project. We CAN do all the hard things. Best of luck, Jill
Hi Jill, I have flagstone or slate, (not sure) on the outside on my house. Will the same application work for outdoors? It’s only in part of the front of our house
Can you email me a picture at info@bungalow47.com? I’d love to see what you mean. I would always recommend leaving the grout as is for slate, it looks more natural.
I have black slate that has many white powder looking makes that I’d love to cover as I can not remove them. What color is best for black slate? The grout also has this same white marks, do you still suggest I leave the grout lines as is?
In order for it to look authentic, I would not paint the grout lines, as I didn’t in this current room I am showing. When you are in the room, you cannot tell that the floor stone has been painted. It looks original to that color.
I have the same multi colored slate flooring throughout my 1929 renovation project. The stones are irregular, and the grout is like your first house – wide messy looking grout lines. Like toothpaste! You tore up your tile, but if you had to paint it with those big fat grout lines how would you do it?
Yes, it is. There has been no wearing off or anything, and it looks like it did the day I painted it. Because I only painted the stones and not the grout, you literally cannot tell that this has been painted as it looks like it was the original color. My slate did not appear to have any sealant on it, or if it had, it probably had worn off over the years. Our home was built in the 50s and the slate is original. After I cleaned it, there were only a few slate stones that had a small area that repelled the paint (probably due to something oily still on it) so I wiped the paint off those areas, let it dry, sanded those stones, wiped clean and then repainted and they were perfect after that.Light sanding seemed to be enough to remove whatever oily residue was on there.
Was there any sealant on the slate before you started painting? I’d like to do this but wondering if I need to sand or apply a remover to open up the porousness of the slate. Great post by the way! Is it still holding up?
I would use an epoxy paint in a bathroom. Especially in a shower area!
Yes you can but it will give a much different look. Also, if you are painting an area that has lots of water spills like a bathroom, you may want to use an epoxy paint (which this is not). If it is a half bath that is not getting lots of tub spills or shower drippings, than it should be fine if sealed, but I have not tested it in excessive water capacity like a bathroom. However, we do mop in our entry with a (not dripping but wrung out) mop occasionally and it is fine.
Hey Jill! Do you know how this would hold up in a bathroom? Our bathroom is covered in this slate tile from the floor, walls, to inside of the shower (walls). We have the exact look of your before photo and would love to give it a facelift somehow! Thanks!
Can you paint over the grout also? I have this red and green slate tile in a small bathroom and want to cover it all 1 color
We live with a small dog, and have a medium sized dog (Australian Shepherd) of my daughter’s that visits often. They have never scratched the floor. Being real slate and porous, the paint really “soaks” into the stone (that’s not really technical speak, but that is what it looks like). I have had only one small stone by the door that I touched up as something heavy got dragged across it (furniture being moved into the house I think) and pulled off a bit of paint, but regular life on it, mine is holding up amazing. We live here with a dog, and have family (including grandkids) and other dogs visit frequently and this area EVERYONE in the house walks through because it is in the center of the house and you can’t really go anywhere without walking on it. Also, we have had some drips and spills in the warehouse, on a cement floor, that we have been walking on heavily with warehouse working conditions and the paint has not come off.
I see the comment about high traffic area and I am wondering if that includes dogs? Do you think it could hold up to dog paws/nails traffic?
Hi Lisha, My area is a high traffic area as well. It is the main thoroughfare to all the rooms in our home, as it sits in the center front of the house. I have had no problems at all with my slate, and it looks as good as it did the day I painted it. If you are wanting to paint your area and are concerned about your traffic, I would suggest researching clear coat finishes for floors and/or tile and seal your painted slate tiles with something meant for high traffic areas. As always, prep is key when you are doing any painting project, so make sure you properly clean your slate and remove any oily or waxy finish or build-up. Oil and wax are the main things that sort of ‘repel’ water-based paint and keep it from really binding. Also, you mention ‘front porch’. Is it covered? I’m not sure about outside areas, so make sure you research a bit more about painting an outdoor space.
I have bluish gray slate on my front portch and in the foyer. I would LOVE to paint it! It is, however, a high traffic area. How does this process hold up?
It depends on the color you paint it. I used the Tarnished Silver and it covered great with one coat. There maybe were one or two tiles that I put a second coat on, just because they were larger and I must have spread the paint out more and not gotten as good a coverage. It’s been about 9 months since I have done it and I still love it. I have only had one touchup that I did near the door where something metal scratched the surface and marred the paint, so I sanded and repainted/buffed/finished that single stone tile and it was perfect again! I was totally thinking I would take this tile out too, but when I thought about what I really wanted and what would be best for the look of this house, it was slate, just not in the current ugly color! Check back in and let us know how your painting went!
I was wondering if you did just one coat of the chalk paint or did it need two coats. I have just purchased a home with a slate floor and I would really like to try painting it. Removing it would be my preferred option but I’d like to give the paint a go first. Hoping I love it.
In the Bungalow 47 Furniture Paint line, there are two colors that I think would work good for a slate floor that are lighter than the Tarnished Silver that I used. They are Metal Roof (which is a medium gray) or Fire Pit (which is the perfect taupe color, not too green with nice brown undertones). I wouldn’t go too light, being that I generally like to make choices that ‘hide dirt’ well LOL! But covering up those crazy colors of slate that were used during that era…anything is an improvement, am I right? Good luck on your project, and thanks for checking out the blog!
Thank you for sharing your project. I have the same slate floor (oooh that color range from red to black, to light green!) and it makes the room chaotic as you well know. How light do you think I can go? I’d like it to turn out a few shades lighter than your floor, if that’s possible. Can you make a recommendation?
Hi Kathleen, So glad you were inspired to do your floor! I believe I did one coat, pretty heavy, but with a darker color I may have gotten better coverage. Using a lighter color, I would do two coats for sure. You want full coverage before you put the Matte Finish on. And I can’t wait to see your project when you are finished! Definitely post a picture on social media and tag me in it! Let me know if you have any other questions!
Hi Jill! You inspired me to paint my multi colored slate hallway! I used Weathered Deck to cover the stones. I am about one third in, and up close some of the color seems to not cover as deeply as it appears yours did. Some stones look a bit streaky. Do I need to do a second coat, or will the Matt Finish cover more fully what I think isn’t covered enough? This is hard work for sure, and I don’t want to do what may not be necessary. Your article did not say you did two coats of color. it may be because my color is much lighter than the one you used. Thank you!
Donna, So good to hear from you. I miss it too. I’m selling in Williamston now at the Antiques Market. Are you still in Howell?
Jill, this project came out beautifully. What a difference it makes. Hope you’re doing well. Miss our little shop in Old Town.
Donna